Monday, September 27, 2010

Week 9 Sep. 20-25, 2010

Hello again. After quite a few weeks of travel and adventure I will hopefully be taking it easy for at least few weeks. Although I made promises to see people in Antwerp, Innsbruck and now Paris so it might not last for long!

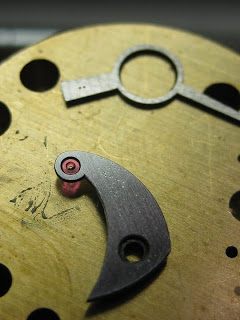
Anyways back to the watchmaking. Last week I continued working on the regulating arm. I wasn't sure how I was going to set up the regulating pins but after a long debate I decided to use just 2 brass pins. There wont be a bottom cap on them but my teacher said it wouldn't be necessary. I don't have pictures of the pins. They are 1 degree conical and I will have to bend them straight once they are in. I had to drill 2 holes in the regulating arm and you can see them in the picture below. The holes are 0.18mm in diameter and only 0.08mm apart. Also in the picture you can see I have not yet made the straight interior corners. This is still in the just milled state. Later in the week I made nice sharp inside corners. You can kinda see them in the second photo.


I also had to do a bunch of figuring to see how big to open the hole in the middle. The Incabloc jewel will be holding down the regulating arm and stud holder so it has to be a good snug fit. But the regulating arm also has to be movable so not too tight. After a lot of drawing and checking I opened the hole to just the right size. It is on a 20 degree angle to fit the jewel setting I chose.

So after all that I filed the inside corners. I still have to harden and temper the piece, bevel the edges, and flat polish the top. So much more work left!

The other thing I did last week was make a new pallet fork bridge. If you remember from the older post the one I made before had the locating pins pushed into the bridge. Well after inspecting it further I noticed that you could kinda see the pins from the top from certain angles. And since the pin was so close to the edge of the bridge it had cracked the bridge. So my only option was to make another one. But this time I milled the pins out of the full material so I won't have this problem again.

I also worked on finishing this piece a little further than the rest. I made the bevel around the edge and for the screw and jewel. The bevels aren't polished yet but I can do that closer to the completion. I just wanted to get a feel for some bevel and finishing work. All of my bridges have interior angles (except the balance bridge). These are a sign of very high end finishing on watches because it can only be done by hand. Click this link to read more about what the hell I'm even talking about. It is not very easy to achieve. I'm sure I will be spending many hours trying to finish these interior angles. But it definitely looks the best to me. I think I have about 10-15 of these to do, so maybe I'll be decent at it by the end!

Here is the pallet fork bridge so far. Not very easy to see but it is beveled a bit! I will probably increase the bevel a bit and also once it is polished it will look much more obvious.


The balance bridge is coming along nicely. If only I would get the Incabloc jewels I ordered....


I still need to make the swan neck spring for the adjustment of the regulating arm. That has been a little tricky to design and map out for the milling process. I have to compensate for the fact the spring will be in a different position when in use so I have mill it out differently. It's a little bit of guesswork (I'm sure an engineer could figure it out) but nothing that important. Probably with 1 or 2 trial and errors I should be able to get it.

Just a picture of some of the bridges and parts I've made so far. Not everything of course but nice to look at!


And lastly a pic from my bench the other day. The sun has been hitting my bench at just the right angle in the morning for some nice light. I was adjusting the pallet jewels for a Rolex 3055 movement. And if you're interested I've posted pics from my travels on my flickr. They're also on the side of this blog. Cya!

Saturday, September 18, 2010

Week 7 & 8 Sep. 6-18, 2010

Sorry to the followers of this blog, I've been a bit slow with the whole process as of late so this is a double post. Been traveling to see the parents a bit so a bit less focused. But nonetheless I did a few things and here they are.

I started making the regulating assembly. It was milled out of a piece of steel. Lots of work to do at this point but I just left it for now.


A lot of regulating assembly's have the two pieces aligned but I didn't like the idea of it blocking the view of the pallet fork so I shifted it. This will also be better for timing as the regulating pins should be less than 90 degrees from the stud.

The rest of the week I spent planning for the power reserve system. But no pictures about that. Trying to figure out the best and easiest way to incorporate it in the movement. I believe I will be making some pinions.... not easy!

At the end of the week I made a new balance staff for my movement. I am changing the whole balance bridge and jewel so the heights are different and I couldn't use the original one. Took about a day and a bit but I was able to make it to the dimensions I wanted in one try so that's ok. No guarantee it will work yet until I get the new jewel and fit it on the bridge... so I might have to make a new one. Plus I will have to make a spare in case it breaks sometime (hopefully not soon...). I'll try to take a picture of it to show. The original one was 3.57mm long and the new one is 3.41mm. It also has a few different dimensions in a few spots.

The second week I attempted to make a new click for the ratchet wheel. It didn't turn out so well so I don't have any pictures of that. I'll have to go back to the drawing board before attempting that again, oops!!

After failing in that venture I decided to spend the rest of the week adjusting watches so no more info or those weeks. But here are a few pics I should've included in the last post.

Here is the stud, the screw that holds it, and the bridge (with the threaded hole on top). Might be hard to see but it has a thread! The little hole at the end of the stud is where the hairspring will be attached to. And I also made a groove in it so the screw would grab in the same place.


This is the partially completed bridge. There's still no undercut for the balance and no hole for the jewel. Also the stud holder with the stud in. I actually might have to make a new stud again cause it will probably be too long. But that's what prototyping is I guess! Trial and error big time!

Cya next week, I promise a speedier update.


Tuesday, September 7, 2010

Week 6 Aug. 30-Sept. 4, 2010

Just going to be a short post this week. And I don't have any photos cause I keep forgetting the camera at school!

Anyways, like I said things didn't go very well on Monday and I had to do a lot of fixing to make things work. Had to remake some locating pins and such. then I went to make the recess for the stud holder and made the recess too wide so the whole bridge was useless. So after attempting to make the bridge 4 times I finally got it right...

Then I milled out the spot for the stud holder fixing screw and drilled and tapped the hole to 0.50mm. The bridge still has the full material underneath but I will be cutting that out way later.

Next I decided to drill the hole for the stud screw. Unfortunately I wasn't thinking straight (like usual) and drilled it in a random spot. This wasn't a good idea if I was going to use the original stud because it has a slotted side and that has to line up with the center of the bridge so the hairspring comes out perpendicular to the balance staff. So of course that didn't work out so I had to make a stud as well. This wasn't that difficult though even though it is one of the smallest parts in the watch. It is a pin that is 0.75mm in diameter and 1.80mm long. Then at the end there is a 0.25mm hole drilled through and also a small slotted edge for the screw to catch. And I had to make sure the slot was at the right degree so the spring comes out at 90 degrees to the balance staff. but after drilling a few holes off center I got it and it was fine.

Then I had to adjust the stud screw. This was really really difficult. The dimensions I was working with were extremely small. The screw is 0.40mm thread, and the head is about 0.60mm. The plan was to hide the screw in a recessed part of the stud holder. I went through about 6-7 screws before I got it to grab the stud and be hidden in the side of the bridge. It's really hard to explain on here how hard this was. If I have to do it again I won't be pleased...

And that's about it for last week. Next week will be lots of planning to get the right size for the balance staff and the regulating pins (nightmares to come soon)....

Cya