Last week I worked a bunch on the W-01. I was at the point where all I needed to do is the timing and finishing. But to do the timing I needed to have the balance bridge 100% finished and all the decoration complete. This is because the spring can't be removed after it is timed or everything will have to be done again. This also means that I will have to be extra careful with this part as it can't be refinished again. All the bevels are polished and the sides are straight grained.
So I flat polished the top of the clamp first. I had some troubles and wasn't getting a perfect polish but it was because I was using a bit too much paste. Less is more I guess in the polishing department. After that I polished the two screws that hold the mechanism to the bridge. Then I blued them just right. They didn't have to be blued but I thought it was kinda nice. Unfortunately you can only see the end of the screw and not the head, but I think it's just one of those details that make hand finished watches more special. Here's a pic of those screws.

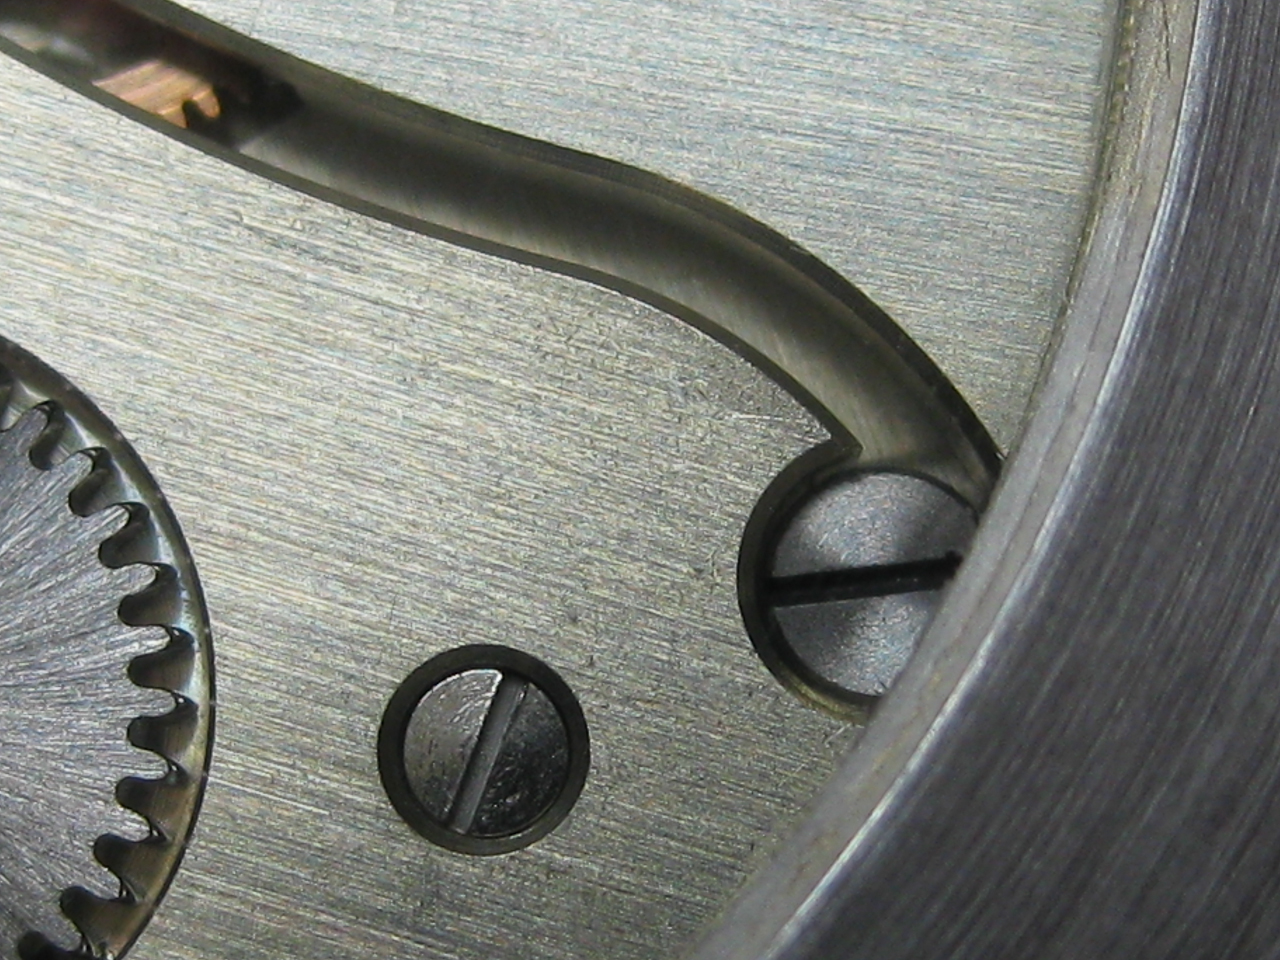
Then I also polished and blued the clamp screw. You can see it in the following photo. The side of the clamp is a bit dirty so I'll have to clean it up before the final assembly.

In this next pic you can see the flawless straight graining on the top of the bridge. Also, I tried to take a picture where you can see the mirror polish on the top of the clamp. You can see the two screw ends are polished as well. I tried to set the Incabloc jewel perpendicular to the screws.


So I flat polished the top of the clamp first. I had some troubles and wasn't getting a perfect polish but it was because I was using a bit too much paste. Less is more I guess in the polishing department. After that I polished the two screws that hold the mechanism to the bridge. Then I blued them just right. They didn't have to be blued but I thought it was kinda nice. Unfortunately you can only see the end of the screw and not the head, but I think it's just one of those details that make hand finished watches more special. Here's a pic of those screws.

Then I also polished and blued the clamp screw. You can see it in the following photo. The side of the clamp is a bit dirty so I'll have to clean it up before the final assembly.

In this next pic you can see the flawless straight graining on the top of the bridge. Also, I tried to take a picture where you can see the mirror polish on the top of the clamp. You can see the two screw ends are polished as well. I tried to set the Incabloc jewel perpendicular to the screws.

After that I started working on the case. The school will be getting new cases for these movements in the future but this project wasn't really planned very far ahead so we have to use some old stuff and make it work. The case we have is one the previous course used for their school watch. But that was for a different smaller movement so I had to do some modification to make the W-01 fit. Just a bit of expansion really, nothing too complicated. I also had to make casing screws (to hold the movement in the case). Here are the casing screws:

The way they hold is by a small cut out on the case, and a slight overhang of the screw from the movement. This pic kinda shows that...

I also had to re-plate the case. This is because the original finish is a rhodium color, and the material of the case is brass. So the places where I made the case larger are visible in some areas like the side where the balance is (next pic).

After I expanded the case to fit the W-01, there was another problem. Since the older movement was smaller, the caseback glass was also smaller and therefore the case was blocking a lot of the movement. Here in this picture you can see the case is covering up almost 2mm from the edge. It's covering almost all of the click spring.

So we had to order new glass and I had to modify the bezel to fit the new glass. The material in that part of the case was quite small so we decided to just glue the glass in. It was good to get some experience glueing a crystal in. I also had to re-plate the bezel after modifying it for the new crystal.
After modification and new crystal. I also cut the stem to the correct length and glued it on.

Only the balance bridge is finished to completion, don't worry...

I also started making some adjustments for the power reserve on the AMS1. I had to make a new wheel because the one I made had a little too much backlash for my liking. And next week I will hopefully get the power reserve and moon phase in working order! One last thing, just wanted to show the smallest part I had to make for the watch. It's not the most complicated, just a pin with a top, but still the smallest and not easy to find if it jumps out of your tweezers. It's the pin that holds the satellite wheel on the intermediate wheel.

Amazing stuff!
ReplyDelete