Monday, December 7, 2009

I'm a real boy!


I'm a real boy

Ok I always have been but in the words of Pinocchio "I'm a real watchmaker!". But seriously I have actually made a real part that works in an actual watch. How about that. And it's a part that is used by the watch wearer to boot! Maybe this doesn't technically qualify me to be a full watchmaker just yet but hey, feels important to me so suck it!

So what part am I talking about you might be wondering now (if you haven't skipped to a much more interesting blog)? Well it's a winding stem folks. You know, that part that connects the crown you pull out to set the time.


The first two I made (the ones on the outside that look the same) are not really very common dimensions if at all for a real watch. But the one in the middle is fully functional in a 6497 movement. Which coincidentally enough is supposed to be the movement we are basing our school watch on (however there are talks of a completely original WOSTEP movement, cross your fingers!). So this was finally a project that had some more depth and purpose (not to discredit toolmaking in any way). It was nice to finish something that would serve a purpose in a real watch. Anyways, the one in the middle took me about 8 hours to make which seems like a long time but for the 3rd one made in my life I think it's a decent time. The one I made today (no picture) took about 6 hours so it's getting much easier. I was told some people take 3 days or so the first few times. I'm glad this wasn't the case for me since I am not sure I have learned the patience for that just yet!

Scaled picture. Measurements were within .03 mm everywhere on the bottom one. Except the threaded part which I left cause it didn't matter...

Saturday, November 21, 2009

Finished projects

Here are some pictures of the projects I finished last week. The first is the polishing tool I mentioned before and the second is a couple staking blocks. Thanks Rob for mentioning about the plastic one in that forum. I whipped that one up in a couple hours. Just to let you guys know, these tools are not cheap to buy from tool making companies. The plastic staking block I made is bigger than the one you can buy from Bergeon and that one is $60. So I'm glad we are able to make some of these tools rather than buying them.


I have also started a somewhat new section in the course. It is still turning but now it is turning between centers. The reason for this is to create a lot more accuracy in small and important work like balance staffs and pivot gauges. It also makes it so you can remove the piece you are working on to measure and still be able to trust the centering after. This method seemed quite intimidating at first since you have to turn the piece by hand and use the graver with the other. It requires a lot of coordination but it isn't as bad as I thought. Here is a video of what I'm talking about:

Friday, November 6, 2009

Handle this!

Just some photos of the handle for the polishing tripod. Designed everything myself. I had to design it so that the blue wouldn't get scratched off with the turning piece. I did this by making it a bit smaller so the cylinder rides on the outside only.

Enjoy!


Comments are always welcome!

Thursday, November 5, 2009

Update

Hey there. Here's an update on the project I've been working on the last 2+ weeks.

This is what it supposed to look like in the end. Obviously it will look much better than this but this is just a reference to get ideas from. We also have a book of the last groups projects to look at to get ideas from as well. It is a polishing tripod. It's what I have been using to polish the screws for the other projects and also for the screws for the one I'm making. The pictures are missing part of the handle that is used to turn the operating screw.


This is the base piece and was cut and filed by hand.


I had to make a holder to screw into the holes on the edge so I had a guide to file a nice round corner.


This is the sliding piece that goes in the middle. It is held by 2 screws.


Here is a few pictures from making the knobs for the height adjusters. This was all my own design and ideas based on the above example.


This is actually two pieces that are screwed together using the brass holder. I did this purely for a visual aesthetic so that if you screw the bottom holder up to the top one, the slots line up (this stuff is really hard to explain without showing in a video).


This is what the milling attachment for the lathe looks like.


And here is the piece after all 9 slots have been milled out. This splits into 2 pieces.


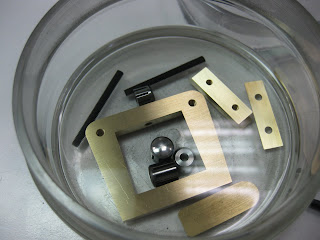
Here's a collection of some of the pieces for the tripod. Everything is kept in benzine so it won't oxidize. I also keep some parts in isopropanol alcohol. usually the polished parts.


Wednesday, October 28, 2009

Oops.... I did it again

Here's the finished pallet fork holder. The first brass plate I made was fine until I broke 3 0.30 mm drill bits in it. So I had to make a whole new one. It probably took about 5 hours to make the first one without bevels. But since then I have gotten a bit better at the process and this one only took 2.5 hours with the bevels (bevels take a long time). There aren't any holes in the plate for these pictures. There should be a few holes at the end of the blue spring so the pivot of the pallet fork can sit in but I'll just drill them later.


Saturday, October 17, 2009

More pictures

Here are a few more pictures of my projects. Just trying to be creative...

This one is of a piece I decided to flat polish. It is a piece of steel that has an absolute mirror finish. It's quite cool, but took a LONG time to do. Just trying to show the reflection on it. The piece is actually just the silver-ish part going from the bottom left to the top right of the reflection. It is the piece in my last post with the little ruler.

This is just a practice piece of the tempering process

Truing caliper for wheels

Angle tool

I know they kinda look dirty...

Try squares


Stand for setting tweezers and other tools on


Putting the stand to use


Wednesday, October 14, 2009

Making parts

Just a few pictures on the process of making a screw. It is for a pallet fork holder.

First step is to thread the end

This screw has a different purpose. It's meant to have a spot that I can grab with tweezers to pick up the plate. That's why it looks like this.


And here is the screw pretty much done except the slot for the screwdriver

To make the slot in the head there is a milling attachment for the lathe. It's pretty easy to use and takes about 10-15 minutes.

This is what the screw is for. This plate is a pallet fork holder. In the other hole there will be another screw that hold down a spring that will hold down the pallet fork. Then I'll drill some holes to hold the pivot. I'll provide a better explanation when it's done.

Here is the start of the spring

I'm just polishing this spring right now which is an extremely slow process. I think I spent 6 hours polishing today so far. Just one side to do though thankfully. If it was a screw I'd have been done in 30 minutes. After this I have to blue the spring so it looks nice and then polish the screw to hold the spring to the plate. Might have some pictures tomorrow.